FAQs
Germany
Frequently Asked Questions
General
End of Day closing options (NFS = Z)
Two options are available for End of Day closing:
1. End of Day closing via the cash register
Send the following transaction to the EFR via the POS system:
<Tra>
<ESR D="2024-06-01T08:30:15" TL="001" TT="1" TN="8" NFS="Z" Opr="101" OprN="Mario Rossi" />
</Tra>
https://docs.efsta.eu/efr/api/business-cases#z-report--end-of-day
2. End of Day closing via the EFR
- Open the corresponding EFR
- Navigate to the Profile section in the EFR
- Open EFR Control
- Set the attribute “Fiscal_Z” there(Note: pay attention to case sensitivity!)

https://docs.efsta.eu/efr/api/additional-functions#attributes
How can I change the company's legal name?
Preparation
Perform a daily closing
- Send NFS=Z to the EFR
- Create a TSE export
Old Installation
- Uninstall EFR
- Archive or delete the folder:
C:\ProgramData\EFR - In the portal:
- Deactivate EFR
- Deactivate the old company
Create New Company
- Create a new company in the efsta portal.
- Order the TSE.
- Please note that hardware TSEs require a delivery time.
- For TSEs ordered via efsta, the assignment is handled automatically by the efsta Cloud.
- For self‑purchased TSEs, manual configuration is required.
Reinstall EFR
- Download EFR Germany
- Install EFR
- Open a browser:
http://localhost:5618 - Configure the profile page, for example:
- Badge
- Attributes
Final Steps
- Inform the Partner Manager so that:
- billing is switched to the new company
- a special termination of the old fiscal unit can be initiated if required
To whom does the Cash Security Ordinance apply?
The Cash Security Ordinance (KassenSichV) defines requirements for both system providers and business users to ensure legally compliant handling of cash transactions.
Who is responsible?
The responsibility for compliance is shared between different parties.
Manufacturers and providers
Manufacturers of:
- cash registers
- cash register systems
- software solutions for recording business transactions (e.g. accounting programs)
are responsible for the legally compliant implementation of the KassenSichV.
efsta supports this requirement by offering:
- efsta EFR middleware
- provided as Compliance as a Service
Taxable entrepreneurs
Taxable entrepreneurs are also subject to the KassenSichV.
They must ensure:
- the legally compliant use of the selected cash register system
- compliance with all related obligations
Additional Requirement
From 1 Jan 2025, entrepreneurs must also comply with the following:
- The reporting obligation for cash registers
Who is affected by the reporting obligation?
From Jan 1, 2025 new reporting obligations apply for cash register systems in Germany. These requirements affect all taxable persons using electronic recording systems and the TSE(s) they use to the authorities.
Who is affected?
From January 1, 2025:
All taxable persons are required to transmit:
- electronic recording systems (cash registers)
- and the TSE(s) used
The taxable person is responsible for reporting the required cash register data.
Deadline for existing systems
All electronic recording systems within the meaning of Section 1 (1) sentence 1 KassenSichV that were acquired before July 1, 2025 must be:
- reported no later than July 31, 2025
- including all TSE(s) used
How reporting is done
Electronic data transmission will be possible from January 1, 2025 via:
- “My ELSTER”
- the ERiC interface
Important requirement
All systems of a business premises must be:
- reported uniformly
- in a single XML data file
DATEV
Are registers created manually in MeinFiskal?
When working with MeinFiskal, it is important to understand how registers are created and initialized.
Explanation
- No. Registers are not created manually
- They are created automatically:
- during the first successful export
This means:
- no manual setup is required
- the system handles the creation process automatically
Do I need one DATEV account per company?
When working with multiple companies, questions often arise regarding the required number of DATEV accounts.
Explanation
No. One DATEV account can manage:
- multiple companies
This means:
a separate DATEV account for each company is not required
What data is transferred to DATEV?
When transferring data for DATEV, specific fiscal data must be provided in a standardized format.
Explanation
The following data is transferred:
- Fiscally compliant DSFinV‑K cash‑register data
This ensures that:
- the data meets the required legal standards
- the export is compatible with DATEV systems
- fiscal data can be processed correctly
DSFinV-K
What's the DSFinV-K?
The Digital Interface of the Tax Authorities for Cash Register Systems (DSFinV‑K) defines how cash register data must be structured and exported in Germany.
Explanation
It ensures that:
- all companies using an electronic recording system(e.g. cash register, POS, ERP system)
- use a standardized structure for:
- data entry
- data export
Purpose of the DSFinV‑K
The DSFinV‑K enables:
- uniform data formats across all systems
- consistent evaluation by tax authorities
- reliable detection of inconsistencies
This ensures transparency and comparability of fiscal data.
Use during a tax audit
During an audit by the tax office:
- a DSFinV‑K data export is created
- the data is analyzed using audit software
👉 The software used is:
- IDEA (Interactive Data Extraction and Analysis)
The analysis checks for:
- errors
- gaps
- data inconsistencies
KassenSichV
What is regulated in the KassenSichV?
The KassenSichV defines requirements to ensure that manipulation of sales data can be detected reliably.
Purpose of the regulation
The aim of the KassenSichV is:
- to detect subsequent manipulation of sales data
- to ensure transparency and traceability of transactions
How verification works
Verification is carried out using a data export, defined as:
- DSFinV‑K (Digital Interface of the Tax Authorities for Cash Register Systems)
The tax office checks this data using:
- dedicated verification software
- analysis for:
- changes
- missing entries (gaps)
Role of the technical security device (TSE)
Each cash journal entry / transaction is:
- provided with an electronic signature
- generated by the technical security device (TSE)
Detection of manipulation
If transactions in the journal are manipulated:
- the chain of signatures becomes inconsistent
Using verification software, it is possible to:
- identify inconsistencies
- determine exactly where manipulation has occurred
What is the Cash Register Security Ordinance (KassenSichV)?
The Cash Register Security Ordinance (KassenSichV) is an ordinance of the Federal Ministry of Finance (BMF) in Germany.
It defines mandatory requirements to prevent manipulation of cash register systems.
Purpose of the ordinance
The KassenSichV introduces:
- mandatory standards for tamper-proof recording of transactions
- technical requirements for electronic recording and security systems
This includes systems such as:
- cash registers
- ERP systems
Key requirement
From January 1, 2020, all cash registers in Germany must be equipped with:
- an anti-tampering device
This device is known as the:
- technical security device (TSE)
What must be recorded according to the KassenSichV?
The KassenSichV defines which data must be recorded for every transaction to ensure compliance and prevent manipulation.
General requirement
Since 30.09.2020, cash registers in Germany must be equipped with a:
- technical security device (TSE)
This ensures that individual records must be kept for all transactions.
Role of the TSE
The TSE:
- signs and saves all cash register transactions
- stores the data in its internal memory
- returns a code to the cash register
This code must be printed on every sales receipt.
Data storage and export
The transaction data is stored in an unchangeable log
- This log is known as the:
- TSE TAR file
This file must be exportable and available for the tax office.
Required data per transaction
For each business case, the electronic recording system must start a transaction that records:
- Time of the start of the process
- A unique and consecutive transaction number
- Type of procedure
- Data of the procedure
- Type of payment
- Time of completion or termination
- TSE signature data (as QR code or plain text)
Reporting Obligation (ELSTER)
All information about the Wirtschafts-Identifikationsnummer (W-IdNr.) and cash register reporting (MeinELSTER)
Important notice regarding cash register reporting obligations (Germany) in connection with the Wirtschafts-Identifikationsnummer (W-IdNr.)
Starting January 1, 2027, it is expected that providing the Wirtschafts-Identifikationsnummer (W-IdNr.) will become mandatory when reporting electronic cash register systems to the tax authorities (via MeinELSTER).
Companies must therefore ensure that:
- they have been assigned a W-IdNr., and
- it is correctly stored in their cash register systems and reporting processes.
Please refer to our end-customer guide for information on where and how to enter the Wirtschafts-Identifikationsnummer. Until the reporting requirement is updated, this remains an optional field, which can already be stored in our system for future reporting.
Store W-IdNr in the portal
The W-IdNr can be stored in the portal under the company settings. To do this, open the menu <...> on the right, go to ‘Edit’, and enter the W-IdNr there. Additional information about the W-IdNr can be found in the mouseover info field.

General Information on the Wirtschafts-Identifikationsnummer (W-IdNr.)
What is the W-IdNr.?
- It is a unique nationwide identification number for economically active persons and entities in Germany.
- It is used for the clear identification of businesses in tax-related and administrative procedures with tax authorities and other public institutions - https://www.bzst.de/DE/Unternehmen/Identifikationsnummern/Wirtschafts-Identifikationsnummer/FAQ/faq_widnr.html , https://www.bundesfinanzministerium.de/Content/DE/FAQ/wirtschafts-identifikationsnummer.html
Issuance of the W-IdNr.
It is assigned to all economically active entities, including:
- Sole proprietors and freelancers
- Legal entities (e.g., GmbH, AG)
- Partnerships and other associations of persons
The legal basis is set out in Sections 139a et seq. of the German Fiscal Code (Abgabenordnung – AO).
Structure of the W-IdNr.
- Format: DE + 9 digits (e.g., DE123456789)
- The structure corresponds to that of the VAT Identification Number
- In cases of multiple economic activities, additional distinguishing elements may be added (phased implementation) - https://verwaltung.bund.de/leistungsverzeichnis/de/leistung/99102049101000
Does the W-IdNr. need to be applied for?
No. The W-IdNr. is assigned automatically by the Federal Central Tax Office (Bundeszentralamt für Steuern – BZSt).
No application is required, neither for new businesses nor for existing ones.
Since when has the W-IdNr. been issued?
- Since November 2024, VAT-registered businesses and small businesses (Section 19 UStG) have been receiving a W-IdNr.
- The rollout is being carried out in phases
- By the end of 2026, all economically active entities are expected to have received a W-IdNr. - https://www.bzst.de/DE/Unternehmen/Identifikationsnummern/Wirtschafts-Identifikationsnummer/FAQ/faq_widnr.html
Does the W-IdNr. replace other numbers (e.g., tax number or VAT ID)?
No, not at present.
The W-IdNr. is used in parallel with existing identification numbers.
In the long term, it is intended to help simplify administrative processes and consolidate identification systems - https://www.bundesfinanzministerium.de/Content/DE/FAQ/wirtschafts-identifikationsnummer.html
What is the W-IdNr. used for?
The W-IdNr. is primarily used for:
- Clear identification of businesses
- Simplifying communication with authorities
- Supporting the transition to more digitalized and automated tax and reporting processes
Entering business location details in the efsta Portal
The business location details required for fiscal notifications must be maintained directly at the corresponding location in the efsta Portal. This ensures that fiscal reports are created correctly and completely.
Step-by-step instructions
Navigate to locations
- In the efsta Portal, click on “Locations” in the left-hand menu.
- Search for the location for which the business location details should be stored.
Edit location
- Click on the <…> icon next to the selected location.
- Select “Edit”.
- Enter the required business location details.
- Save your changes.
Automatic transfer to fiscal notifications
After saving, the business location details are automatically transferred to all subsequent fiscal reports. No additional manual entry is required.
If you do not have the required permissions or cannot see any locations, please contact your cash register manufacturer. They can correctly maintain the location data so that fiscal reports are filled in automatically.
Information of the operating facility in the efsta Portal
The operating facility details required for fiscal reports must be entered directly in the efsta Portal at the respective location.
Step-by-step instructions
1. Navigate to locations
- In the portal, click “Locations” in the left-hand menu
- Find the desired location for which the data should be entered
2. Edit the location
- Click the “<…>” (options icon) on the right-hand side of the selected location
- Select “Edit”
3. Enter the required details
- Enter the required business location details
- Save your changes
Automatic transfer to fiscal reports
Once saved:
The information is automatically applied to subsequent fiscal reports
Missing permissions
If you:
- do not have the necessary permissions, or
- cannot see any locations
Please contact your cash register provider
They can:
- enter the data for the location
- ensure that fiscal reports are filled in automatically
Why is the automatic notification service not working?
The automatic notification service only works if notifications are created and saved correctly. Incorrect handling during creation can prevent automatic processing.
Explanation
If a notification is created manually:
- it can no longer be transmitted automatically
- the automatic service is blocked for this notification
In this case, the notification must be handled manually.
Important note on notification creation
When creating notifications, it is essential to:
- create the notification
- save it without clicking the “Create” button
Only in this way can the notification be:
- processed automatically
- transmitted via the notification service
Manually created notifications:
- are excluded from the automatic service
- must be processed manually
How can I update ELSTER contact information?
If an ELSTER contact is already registered and you need to update information, please follow these steps:
- Click the three dots next to your company

- Open the “ELSTER Report” tab
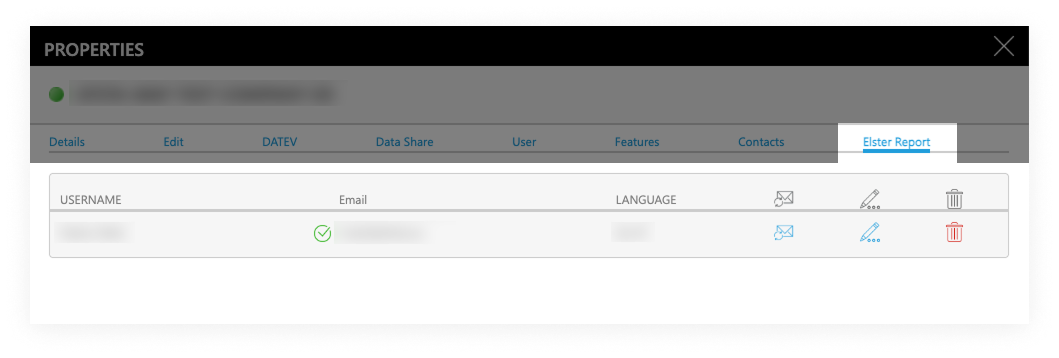
- Click the pencil icon

- Enter the missing or updated information
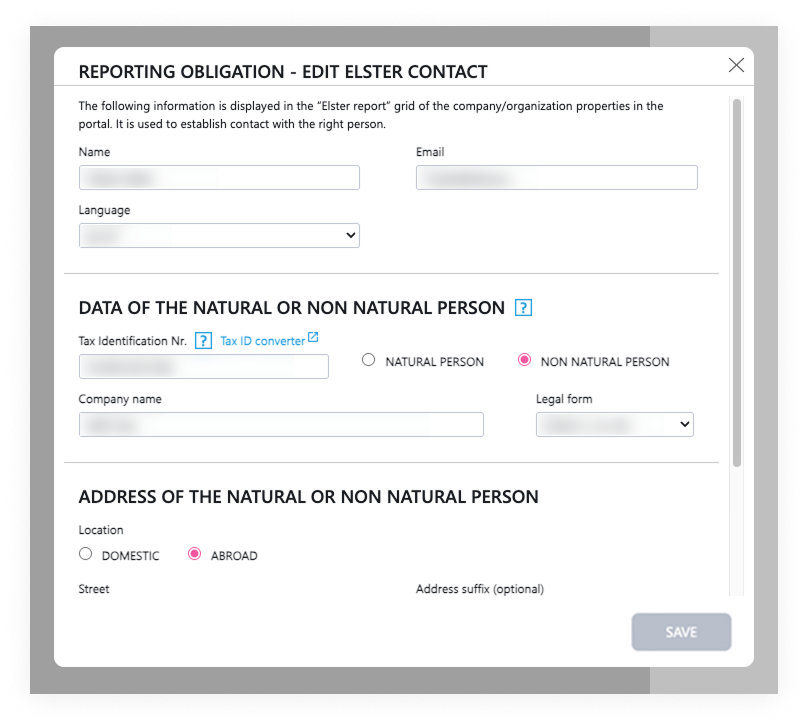
The changes will automatically apply to all future fiscal reports.
How do I register an ELSTER contact?
To register an ELSTER contact for your company, please follow these steps:
- Click the three dots next to your company
- Open the “ELSTER Report” tab
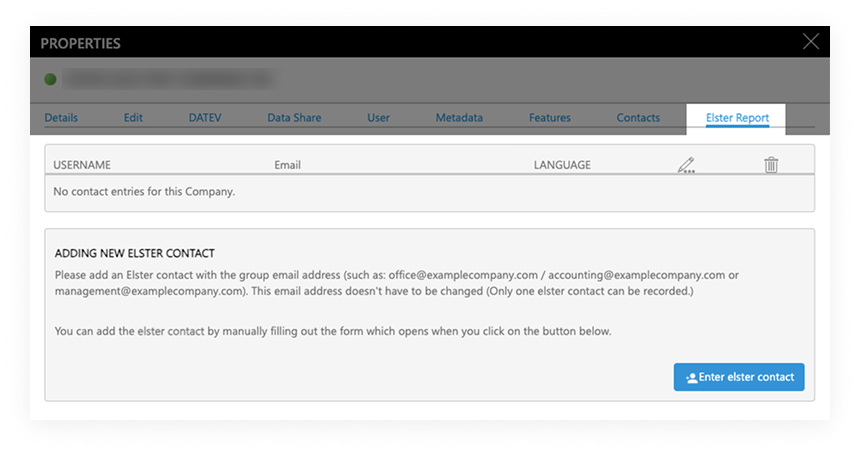
- Click the "Enter ELSTER Contact” button
- Enter the required information
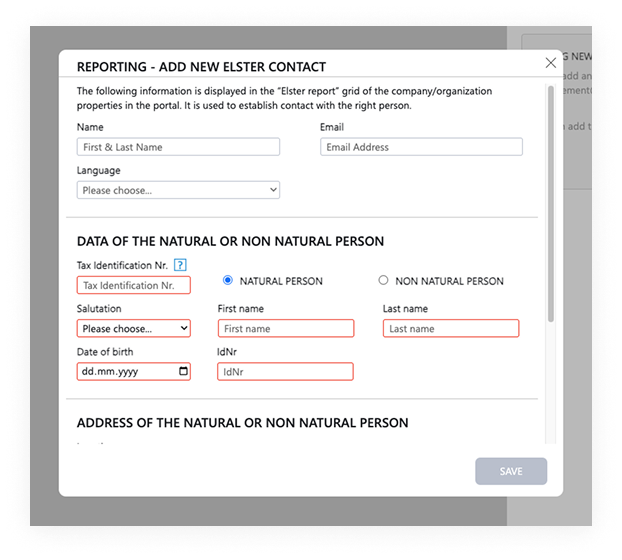
The registered ELSTER contact will be used for all future fiscal reports.
TSE
EFR has no TSE assigned
Cloud TSE
No TSE available in the company
If no Cloud TSE is available for the company, automatic assignment is not possible.
💡 Solution
Order a new TSE for the company via the efsta Portal.
Duplicate cash register ID / identical TL‑TT combinations
Automatic assignment is not triggered if multiple EFRs use identical TL‑TT combinations.
In this case, the system assumes that it is the same cash register.
💡 Solution
Change the TT (terminal ID) in your POS software so that each cash register uses a unique TL‑TT combination.
Automatic assignment not triggered
If the automatic assignment did not start, it can be triggered manually.
Procedure
- Open the company area in the efsta Portal.
- Click on the “…” icon on the right.
- Switch to the “Edit” tab.
- Click on “Trigger auto assign manually”.
Error message “Disabled”
If the TSE status is shown as “Disabled”, the TSE has been deactivated.
💡 Solution
Please send an email to ticket@efsta.eu for further clarification.
Hardware TSE
No driver installed
Some hardware TSEs require a specific driver to be recognised by the system.
💡 Solution
Install the appropriate driver provided by the manufacturer (e.g. Epson, Diebold Nixdorf).
Defective USB port
If the TSE is not detected, a defective USB port may be the cause.
💡 Solution
Check the USB port and try a different connection if necessary.
Hardware TSE deactivated in the efsta Portal
If the hardware TSE has been deactivated in the efsta Portal, it will no longer be displayed for EFRs.
💡 Solution
If the TSE is still in use, please contact us via ticket@efsta.eu.
Default client / main tenant
The main tenant of a MultiPOS or MultiCompany EFR is not a cash register and therefore does not require a TSE.
Initialized and uninitialized TSEs (Swissbit USB TSE)
This article concerns Swissbit USB TSEs and explains the difference between initialized and uninitialized devices.
General information
If a Swissbit USB TSE is purchased through efsta:
- it is delivered in an uninitialized state
- initialization is performed automatically by the EFR
After initialization:
- the TSE can also be used with additional EFR instances within the system
Pre-initialized TSEs
If a Swissbit USB TSE was not purchased through efsta:
- it may already be pre-initialized
👉 In such cases:
the TSE may not be usable with the efsta system
Important limitation
Pre-initialized TSEs:
- generally cannot be used in other POS systems without restriction
- are usually assigned to a specific cash register system
👉 This means:
- a TSE assigned to one system
- cannot automatically be used in a different system
TSE failure and missing signatures
A TSE failure is legally permitted.
In this case, the cash register may continue operating and must not be blocked.
Receipts are signed using a fallback (replacement) signature until the TSE is available again.
The possible causes and solutions depend on whether a Cloud TSE or a Hardware TSE is used.
Cloud TSE
fiskaly Cloud TSE outage
Outage on the fiskaly side
- Check the fiskaly status page
- Check the efsta dashboard in the portal
Local network issues at the POS
- Required fiskaly endpoints not allowed https://docs.efsta.eu/efr/system-requirements
- Antivirus software or TLS inspection blocks communication
Maximum number of open transactions reached
- Caused by missing daily closing (NFS=Z)
- A daily closing is legally required once per day
Duplicate transactions
- Transactions sent twice are detected by the EFR
- These transactions are not signed again
Deutsche Fiskal Cloud TSE outage
Outage on the Deutsche Fiskal side
- Check the Deutsche Fiskal status page
- Check the efsta portal dashboard
Local network issues at the POS
- Check network access, IP addresses and drivers
- Third‑party software may block communication
Maximum number of open transactions reached
- Daily closing (NFS=Z) has not been performed
Error 504 – Circuit Breaker Open
- According to Deutsche Fiskal support, usually caused by local network issues
- Or the TSE status is “Pending”
- The issue usually resolves within one day
Duplicate transactions
- Transactions with identical transaction numbers or identical content
- Are not signed, as re‑signing receipts is legally prohibited
EFR version too old
- Minimum required version: EFR 2.6.0
Hardware TSE
Swissbit USB TSE failure
TSE self‑test
- Regular self‑tests (every 25 hours or after startup)
- Duration approx. 20 seconds, no signing possible during this time
Power‑saving mode
- Unplug the TSE, wait briefly, then reconnect it
Port issues
- Check or change the USB port
Maximum transactions reached
- Daily closing (NFS=Z) has not been performed
EFR version too old
- Minimum required version: EFR 2.5.0
Local fiscal exports
- During local exports, no parallel signing is possible
Epson USB TSE failure
TSE self‑test
- Regular self‑tests (every 25 hours or after startup)
Missing or outdated Epson driver
- Drivers must be installed and up to date
Power‑saving mode / port issues
- Reconnect the TSE
- Check or change the USB port
Maximum transactions reached
- Daily closing (NFS=Z) has not been performed
EFR version too old
- Minimum required version: EFR 2.5.0
Local fiscal exports
- No parallel signing possible during export
Epson TSE server failure
Outdated server driver
- Update the Epson server driver
Slot configuration
- Ensure the slot where the TSE is connected is active
Maximum transactions reached
- Daily closing (NFS=Z) required
Local exports
- No parallel signing possible during export
Login configuration on the EFR
Device_Auth=login:password- If no login is defined:
admin:admin
Diebold Nixdorf USB TSE failure
TSE self‑test
- Regular self‑tests (every 25 hours or after startup)
Missing Diebold Nixdorf driver
- Without the DN driver, the TSE is not recognised
Power‑saving mode / port issues
- Reconnect the TSE
- Check or change the USB port
Maximum transactions reached
- Daily closing (NFS=Z) required
Local exports
- No parallel signing possible during export
Diebold Nixdorf TSE server failure
Outdated driver
- Update the Diebold Nixdorf driver
Slot configuration
- Ensure the correct slot is active
Maximum transactions reached
- Daily closing (NFS=Z) required
Local exports
- No parallel signing possible during export
Login configuration on the EFR
Device_Auth=login:password- If no login is defined:
admin:admin
Cryptovision TSE
efsta does not offer Cryptovision TSEs.
This TSE is plug‑and‑play and does not require a driver.
Therefore, no specific error scenarios are available.
How can I deactivate a TSE in the efsta portal?
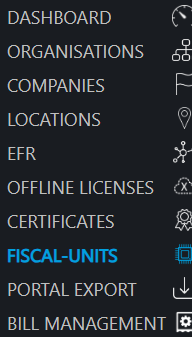
- Navigate to the Fiscal Units section and select the desired TSE
- Click on the
<...>symbol next to the TSE to open the properties window - There, select the “Deactivate fiscal unit” button, which opens the pop-up window
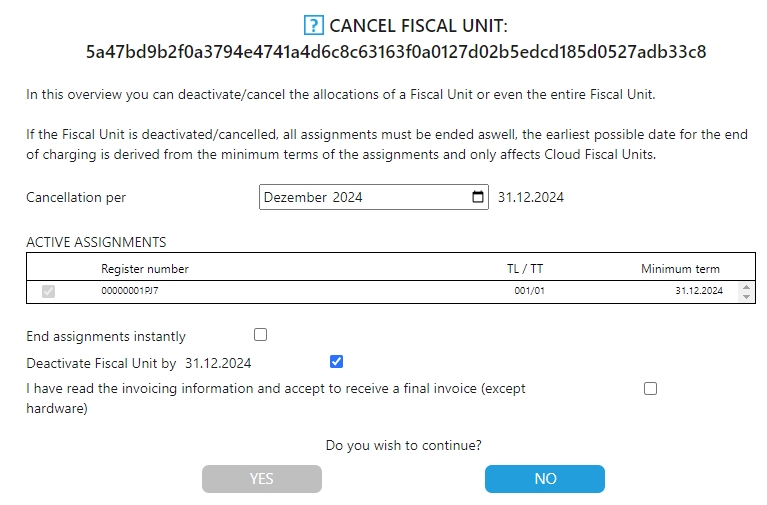
- There you will see the tab to which the TSE is assigned
- You have the option of canceling the TSE or, if it is still to be used, just ending the assignment
- Confirm your selection
Deactivated TSEs are only visible in the Portal if you activate “Show deactivated fiscal units”.

How can I exchange a TSE?
Depending on whether the TSE is a hardware- or cloud type, there are two processes to replace a TSE.
Ordering New TSEs
We recommend that you provide the new TSE in advance before a planned TSE exchange. You are welcome to order TSEs via the efsta portal under the calculator icon.
Hardware TSEs have a delivery time of around 2 weeks, while cloud TSEs are available immediately after ordering.
Replacing Hardware TSEs
- Send a daily closing (
NFS=Z) to the EFR - Disconnect the existing TSE from the device
- Log into the efsta Portal and search for the relevant TSE by clicking on the "Fiscal Units" tab
- Click on the
<…>symbol on the right-hand side of the TSE to be exchanged - Select the “Deactivate fiscal unit” button. In the following window, you can deactivate the TSE
- Plug the new hardware TSE into a free USB port (for SD card TSEs: into the card reader)
- The TSE should be automatically recognized and assigned by the EFR, but if not: - open the EFR (http://localhost:5618) > “Control” menu > “TSE” - select the TSE from the list and click on “Set assignment”
- (Optional) In the EFR interface at “Profile” > “Attributes”, enter your own values for: - TSE_AdminPin- TSE_AdminPuk - TSE_TimePin - TSE_TimePuk - TSE_ClientId
If the TSE does not originate from efsta and is already pre-initialized, these values must be specified so that the EFR recognizes the TSE correctly. (Without adjustment, the TSE automatically initializes the default values)
Epson TSE only:
Windows needs an additional driver which can be downloaded at the EPSON website
Replacing Cloud TSEs
- Send a daily closing (
NFS=Z) to the EFR - Cancel old TSE in the efsta portal
- Log into the efsta Portal and search for the relevant TSE by clicking on the "Fiscal Units" tab
- Click on the
<…>symbol on the right-hand side of the TSE to be exchanged - Select the “Cancel fiscal unit” button
- In the following window, you can choose whether you want to simply end the assignment to the register or deactivate the TSE
- Choose the desired TSE in the Portal under “Order”. After approx. 10 minutes, the new Cloud TSE will be automatically assigned and allocated to a free EFR
- The TSE will be configured during the next heartbeat (approx. every 15 minutes). It will be initialized and used within the next 1–3 transactions
Please note the applicable cancellation periods.
Reporting obligation in MeinElster
The reporting obligation stipulated in the KassensichV requires that any change to a TSE used must be reported in MeinElster within one month.
Notification Service
We fulfill this obligation using our notification service. With the free notification service from efsta, the Elster contact stored in the efsta Portal always receives an email on the following Monday informing them that an XML file is available for processing due to the new TSE, or if using our fee-based automated reporting service, the email will notify them when a new report as been created. Details can be found on the page Mandatory Reporting
How do I order a TSE in the efsta portal?
To comply with the KassenSichV, you need a certified TSE.
You can purchase this directly via the efsta portal.
Please contact your cash register manufacturer to make sure which TSS is compatible with the cash register system or cash register software.
- Go to the “Orders” menu in the efsta Portal

- Select the desired company from the drop-down menu
- Select the desired product for Germany
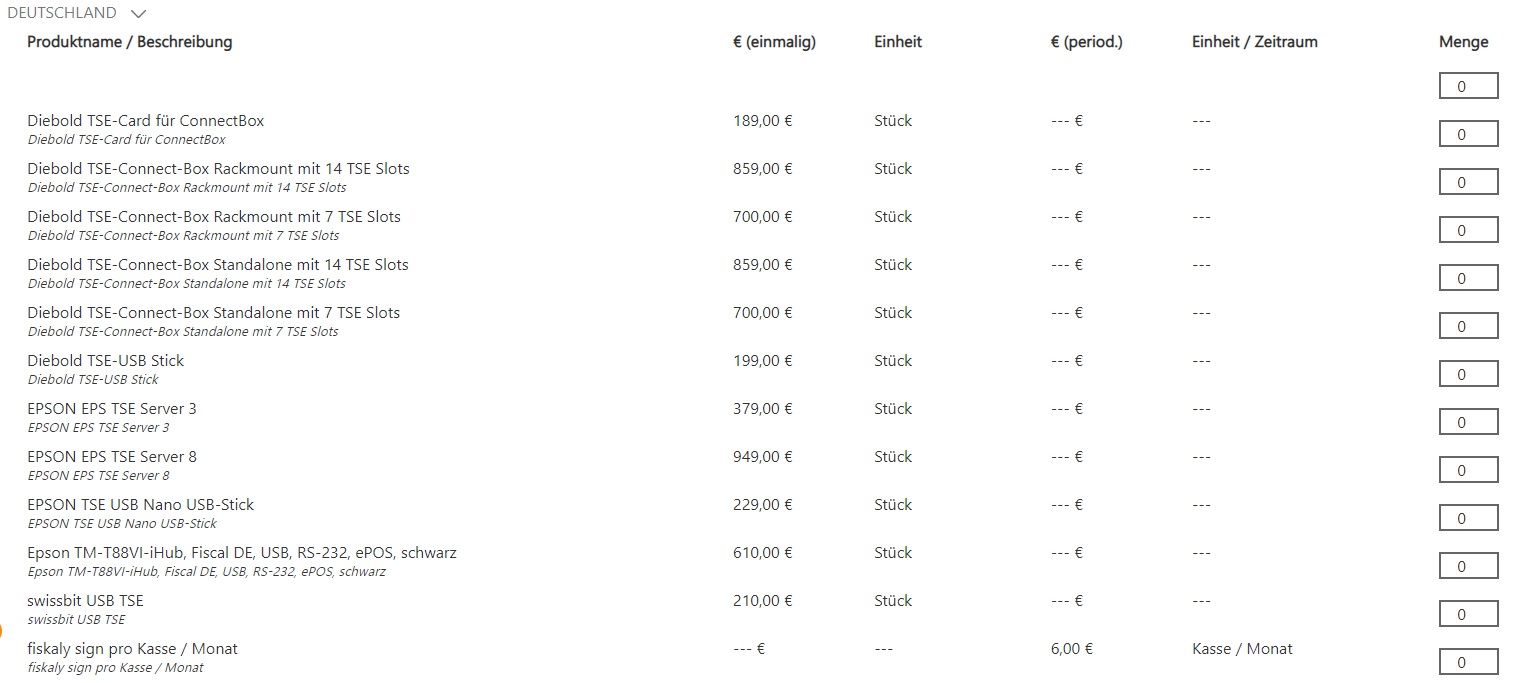
- Enter the number of TSEs required
- Read and confirm the terms of use
- Click on “Next”
- Enter the company address and select the stored billing address (this must be stored in the company master data beforehand). You can change the delivery address if necessary
- Then click on “Next”
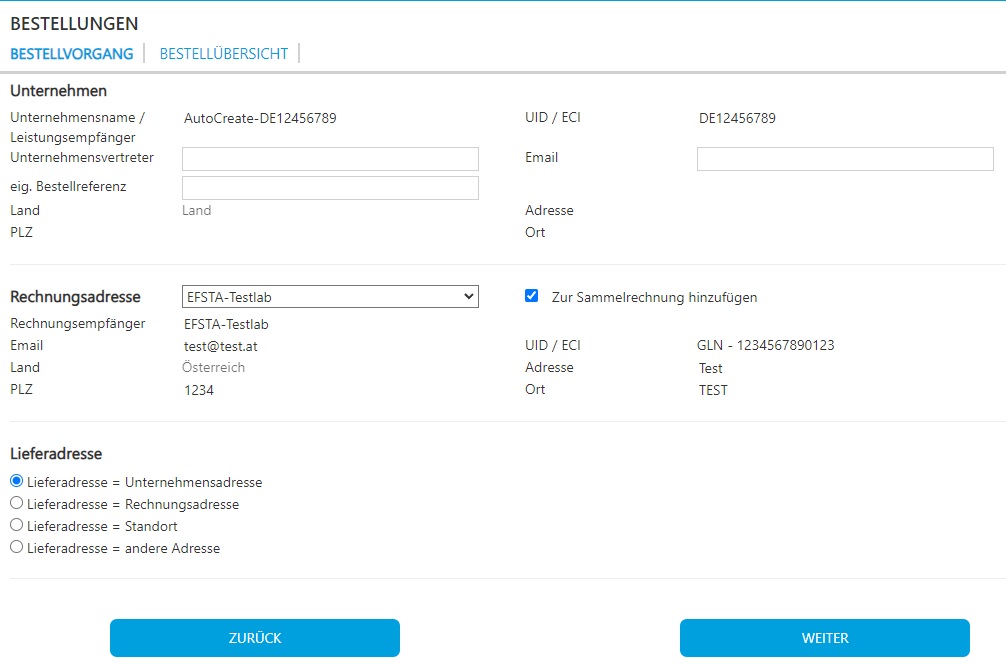
- You will receive confirmation that the order has been successfully completed
Ordering a cloud TSE
The Cloud TSE is available in the efsta Portal approx. 15 minutes after ordering.
The order is processed and dispatched by the efsta sales team. You will receive an order confirmation and an invoice by email.
Ordering a hardware TSE
The order will be processed and dispatched by the efsta sales team. You will receive an order confirmation and an invoice by e-mail. The delivery time is approx. 2-4 weeks. After receipt, you or your cash register manufacturer can install the hardware.
How does the cloud TSE assignment work?
After ordering a Cloud TSE, it is automatically prepared and assigned within the efsta system.
The process includes assignment, synchronization, and final initialization.
Process overview
After a successful order:
- The Cloud TSE becomes visible in the efsta Portal after approximately 5 minutes
Assignment to EFR
- The TSE is automatically assigned to an EFR without a TSE
- No manual assignment is required
Synchronization (Heartbeat)
- A heartbeat synchronizes changes between the EFR and the Portal
- This synchronization takes place every 15 minutes
During the heartbeat:
- The TSE is automatically configured on the EFR
Initialization of the TSE
After the heartbeat:
- A transaction must be carried out
- The TSE is initialized after the transaction
✅ Only after this step is the TSE fully operational.
What is a TSE?
The technical security device (TSE) is a legally required component used in electronic cash register systems.
It ensures that all cash register transactions are recorded securely and in compliance with legal requirements.